What You Need to Know Before You Start
If you've been searching for how to activate eSIM on iPhone, the good news is: it's genuinely straightforward. No queuing at a phone shop, no fiddling with a tiny SIM card tray, no calling customer service. Everything happens inside the Settings app, in a few taps.
I've activated eSIMs on iPhones across dozens of countries, from Norway to the Philippines. The process is the same every time. What trips people up isn't the activation itself, it's the settings you need to adjust afterwards. I'll cover both.
Is Your iPhone eSIM Compatible?
Before anything else, check your model. Every iPhone from the iPhone XS and XR (2018) onwards supports eSIM. That covers the XS, XR, 11, 12, 13, 14, 15, and 16 series.
To confirm yours: go to Settings > General > About and look at the model number.
One thing worth knowing for UK buyers: iPhones sold in the UK still include a physical SIM tray alongside eSIM support. That means you can run two lines at once, your UK SIM and a travel eSIM, without removing anything.
What You'll Need
Three things, that's it:
- A compatible iPhone (XS or later)
- A Wi-Fi connection (needed to download the eSIM profile)
- A QR code from your eSIM provider (sent by email after purchase, open it on a laptop or tablet so you can scan it with your iPhone)
My strong advice: do this at home, not at the airport. Airport Wi-Fi is unreliable, and you don't want to be troubleshooting in a departure lounge.
How to Activate eSIM on iPhone: Step by Step
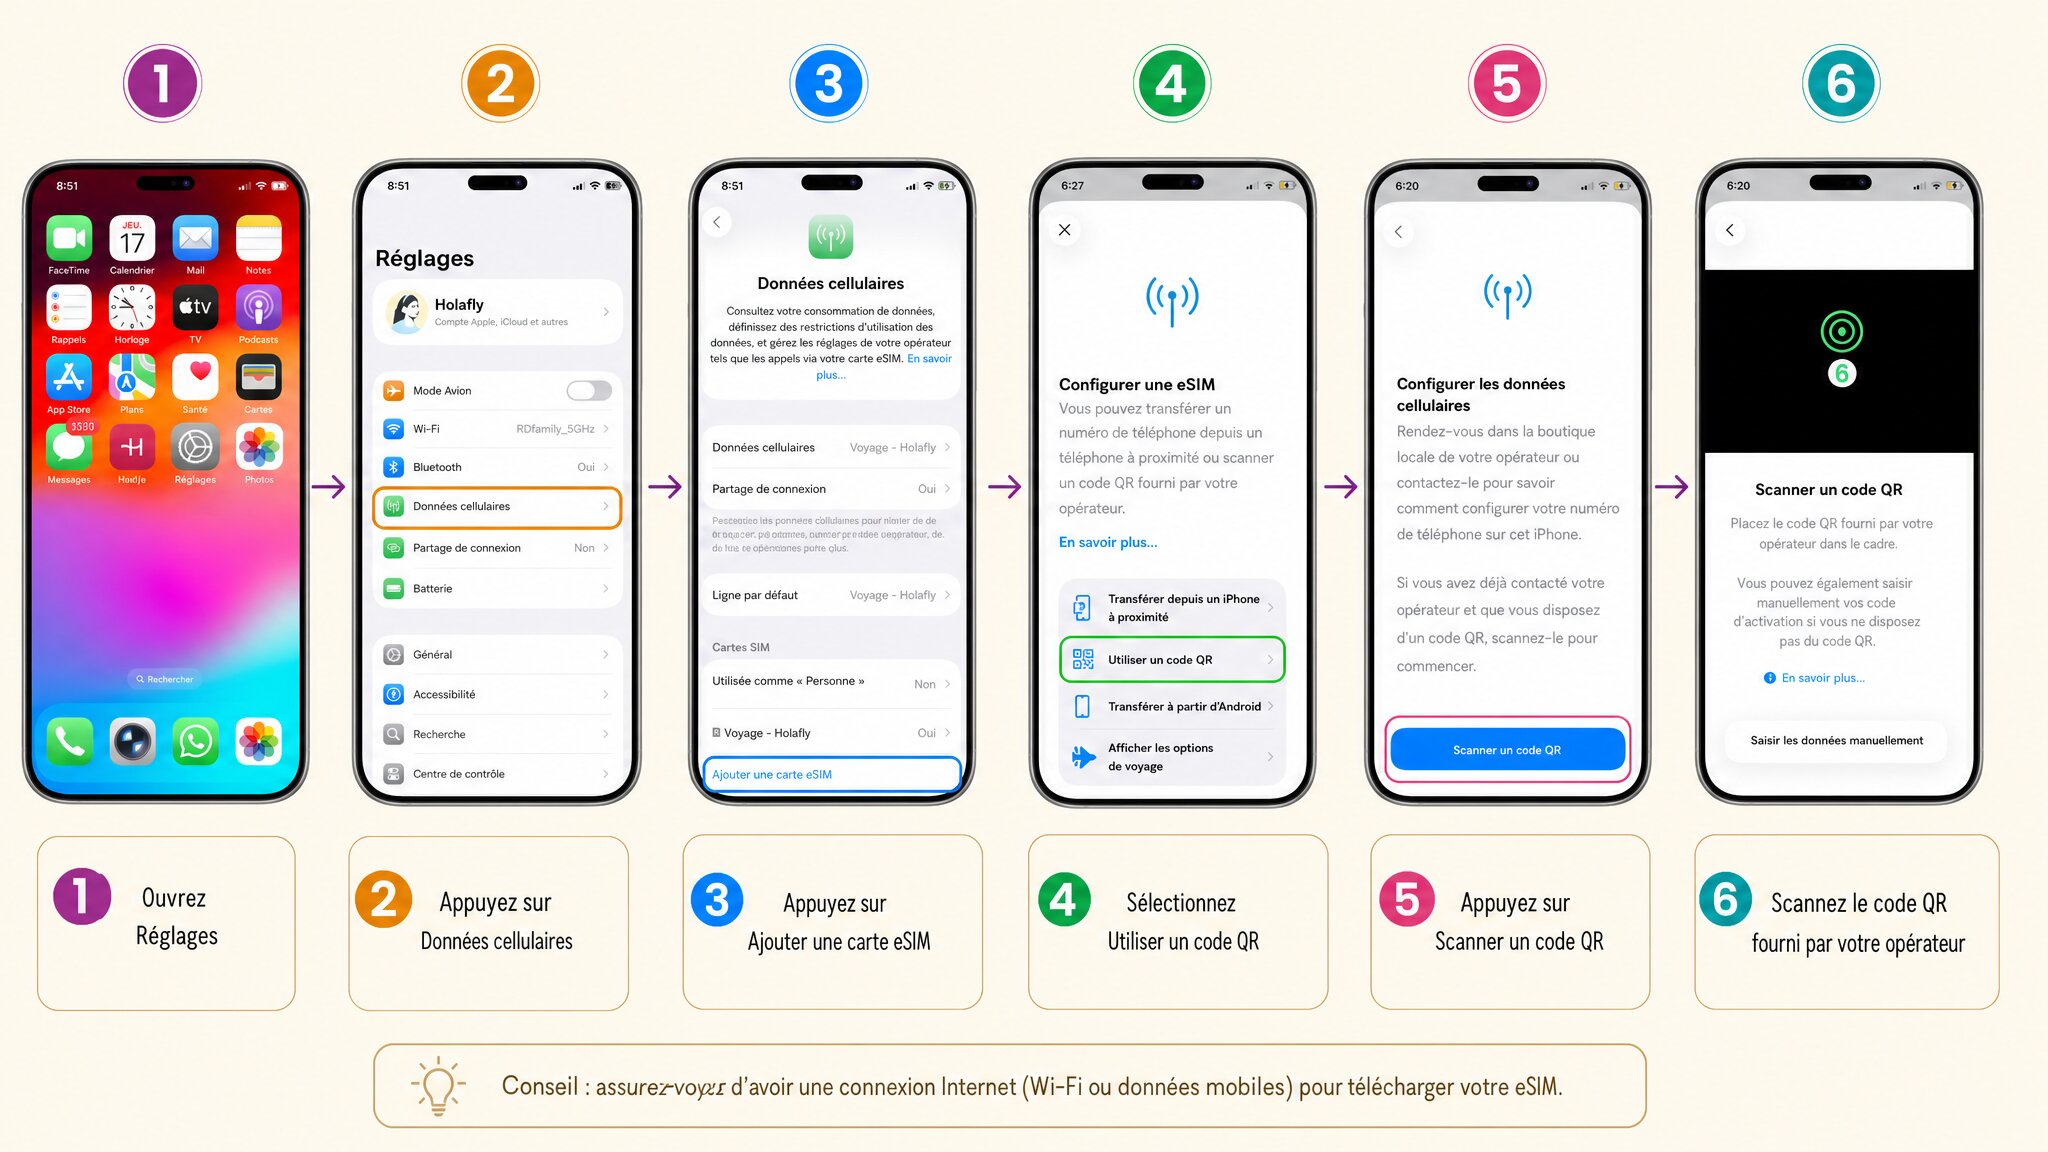
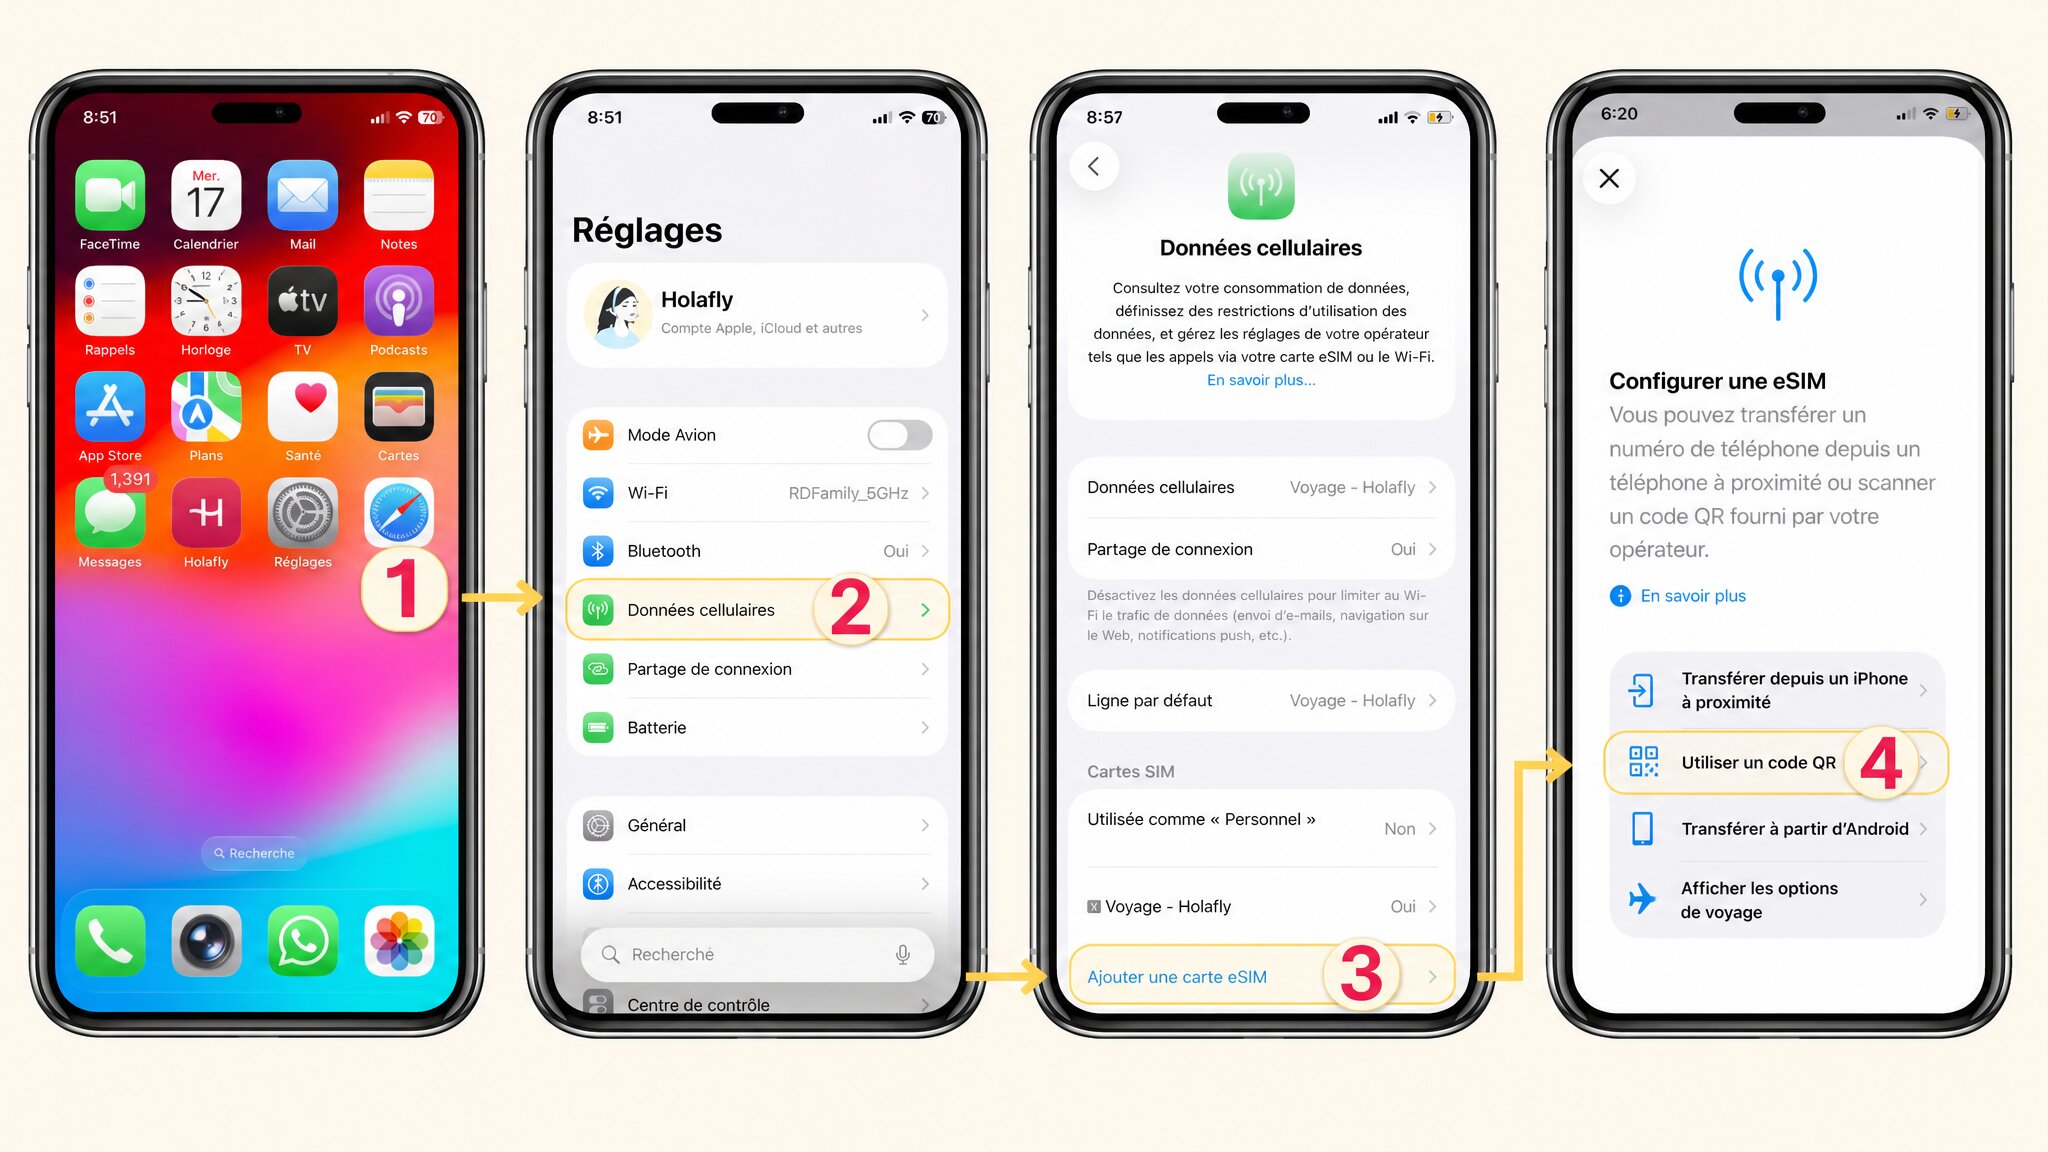
Step 1: Open the Right Menu in Settings
- Open the Settings app on your iPhone.
- Tap Cellular (labelled "Mobile Data" on some UK iPhones depending on iOS version).
- Tap Add eSIM.
- Select Use QR Code.
On newer iPhones running the latest iOS, you might also see an eSIM Carrier Activation option if your provider supports it. That skips the QR code entirely and activates automatically. If it appears, follow the on-screen prompts instead.
Step 2: Scan the QR Code
- Hold your iPhone camera up to the QR code displayed on your laptop or tablet screen.
- Your iPhone detects it automatically and prompts you to add the plan.
- Tap Continue to confirm.
The profile downloads in a few seconds. If your QR code isn't scanning, jump to the manual activation section below.
Step 3: Configure the eSIM for Travel
Once the profile is downloaded, iOS asks you a few setup questions. Here's what to choose:
- Use this eSIM for data? Yes.
- Data only, or also calls and texts? For most travel eSIMs, Data Only is the right pick.
- Low Data Mode? Leave it off unless your plan is very limited.
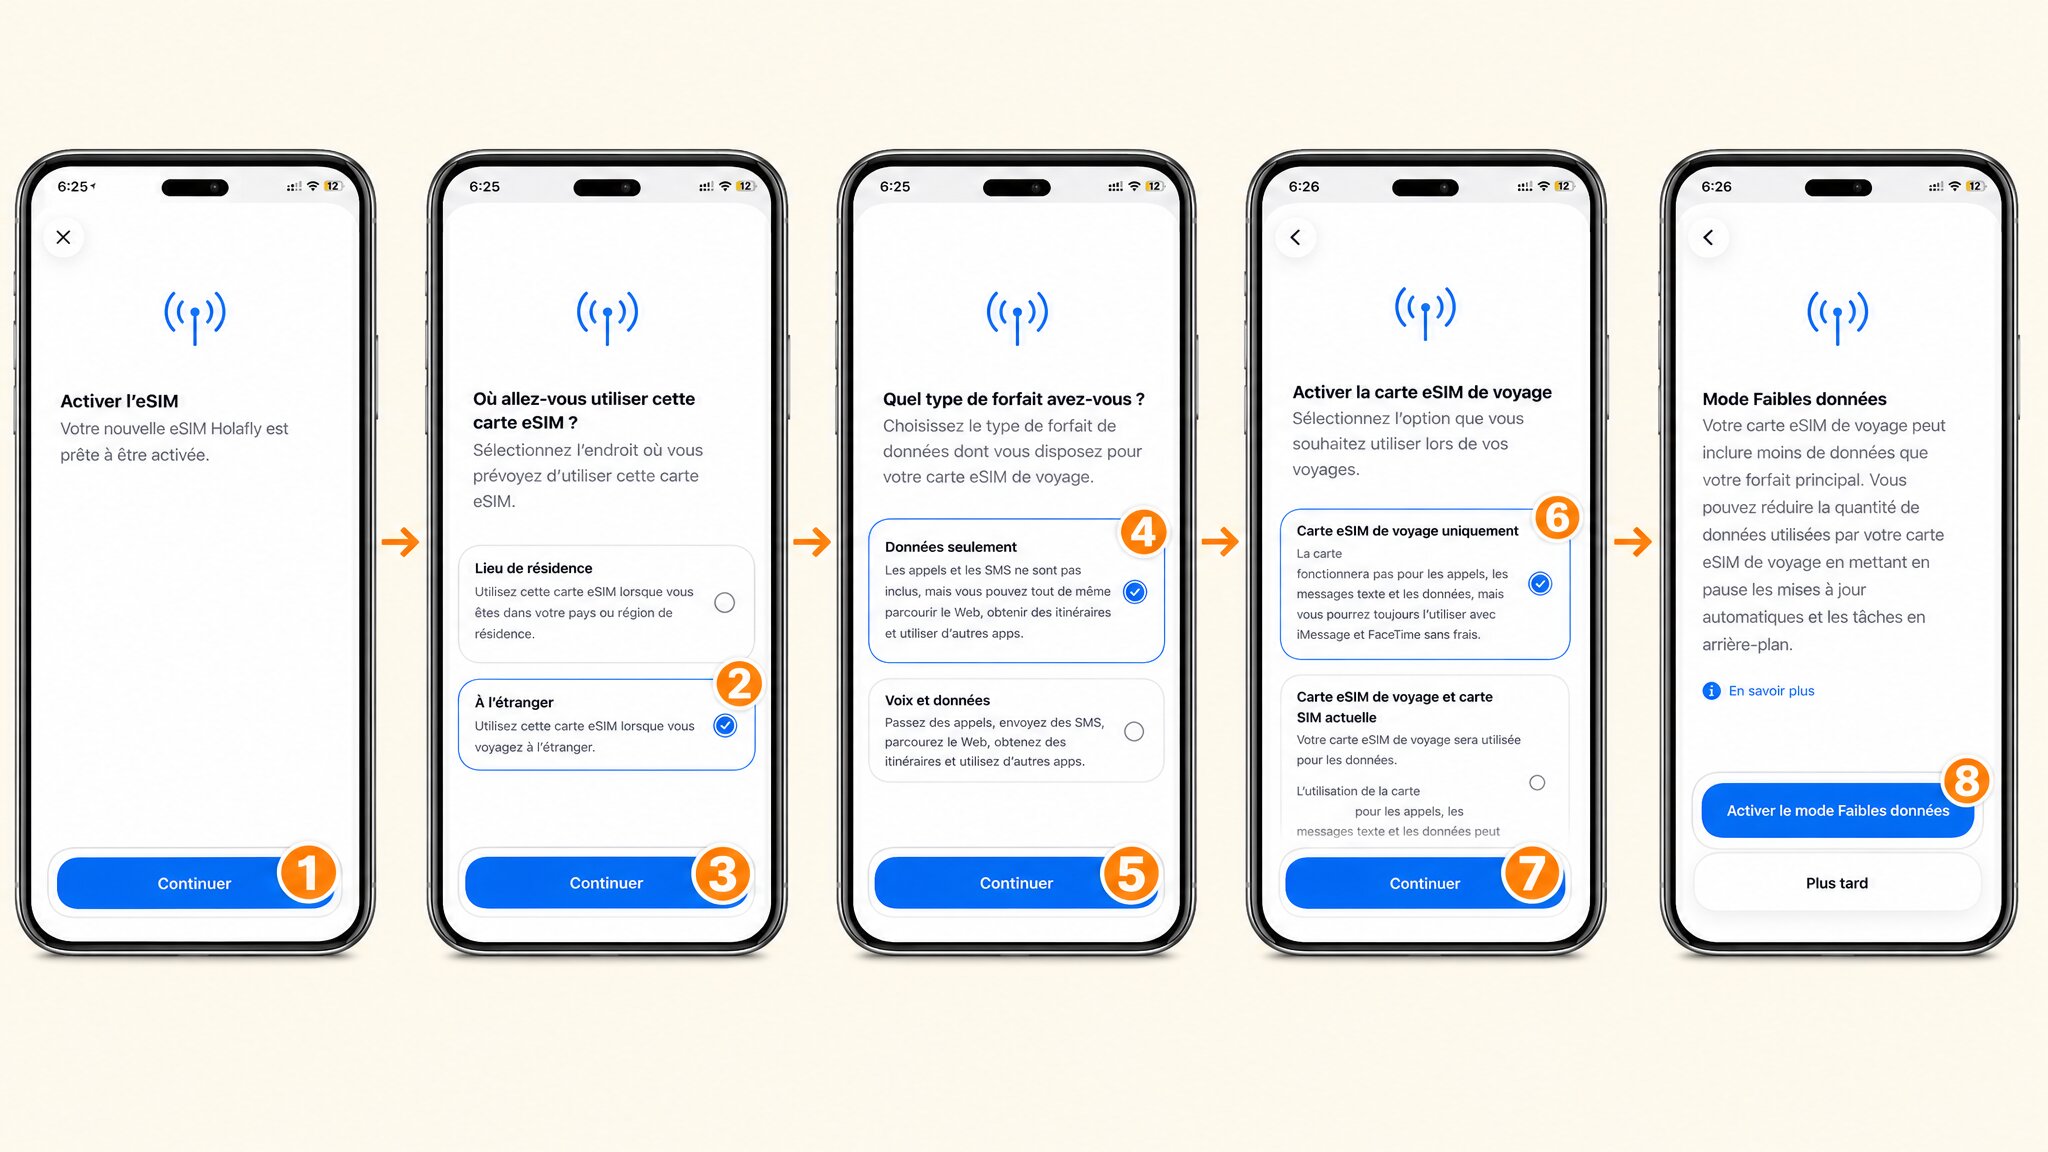
Your eSIM is now installed. But you're not quite done yet.
The Settings Most Guides Don't Mention
This is where most people go wrong. The eSIM is active, but their iPhone keeps using the UK SIM for data, racking up roaming charges. Here's how to prevent that.
Set Your Travel eSIM as the Data Line
- Go to Settings > Cellular.
- Tap Cellular Data (or Mobile Data).
- Select your travel eSIM as the active data line.
- Go back, tap on your travel eSIM's name, and make sure Data Roaming is switched on (green).
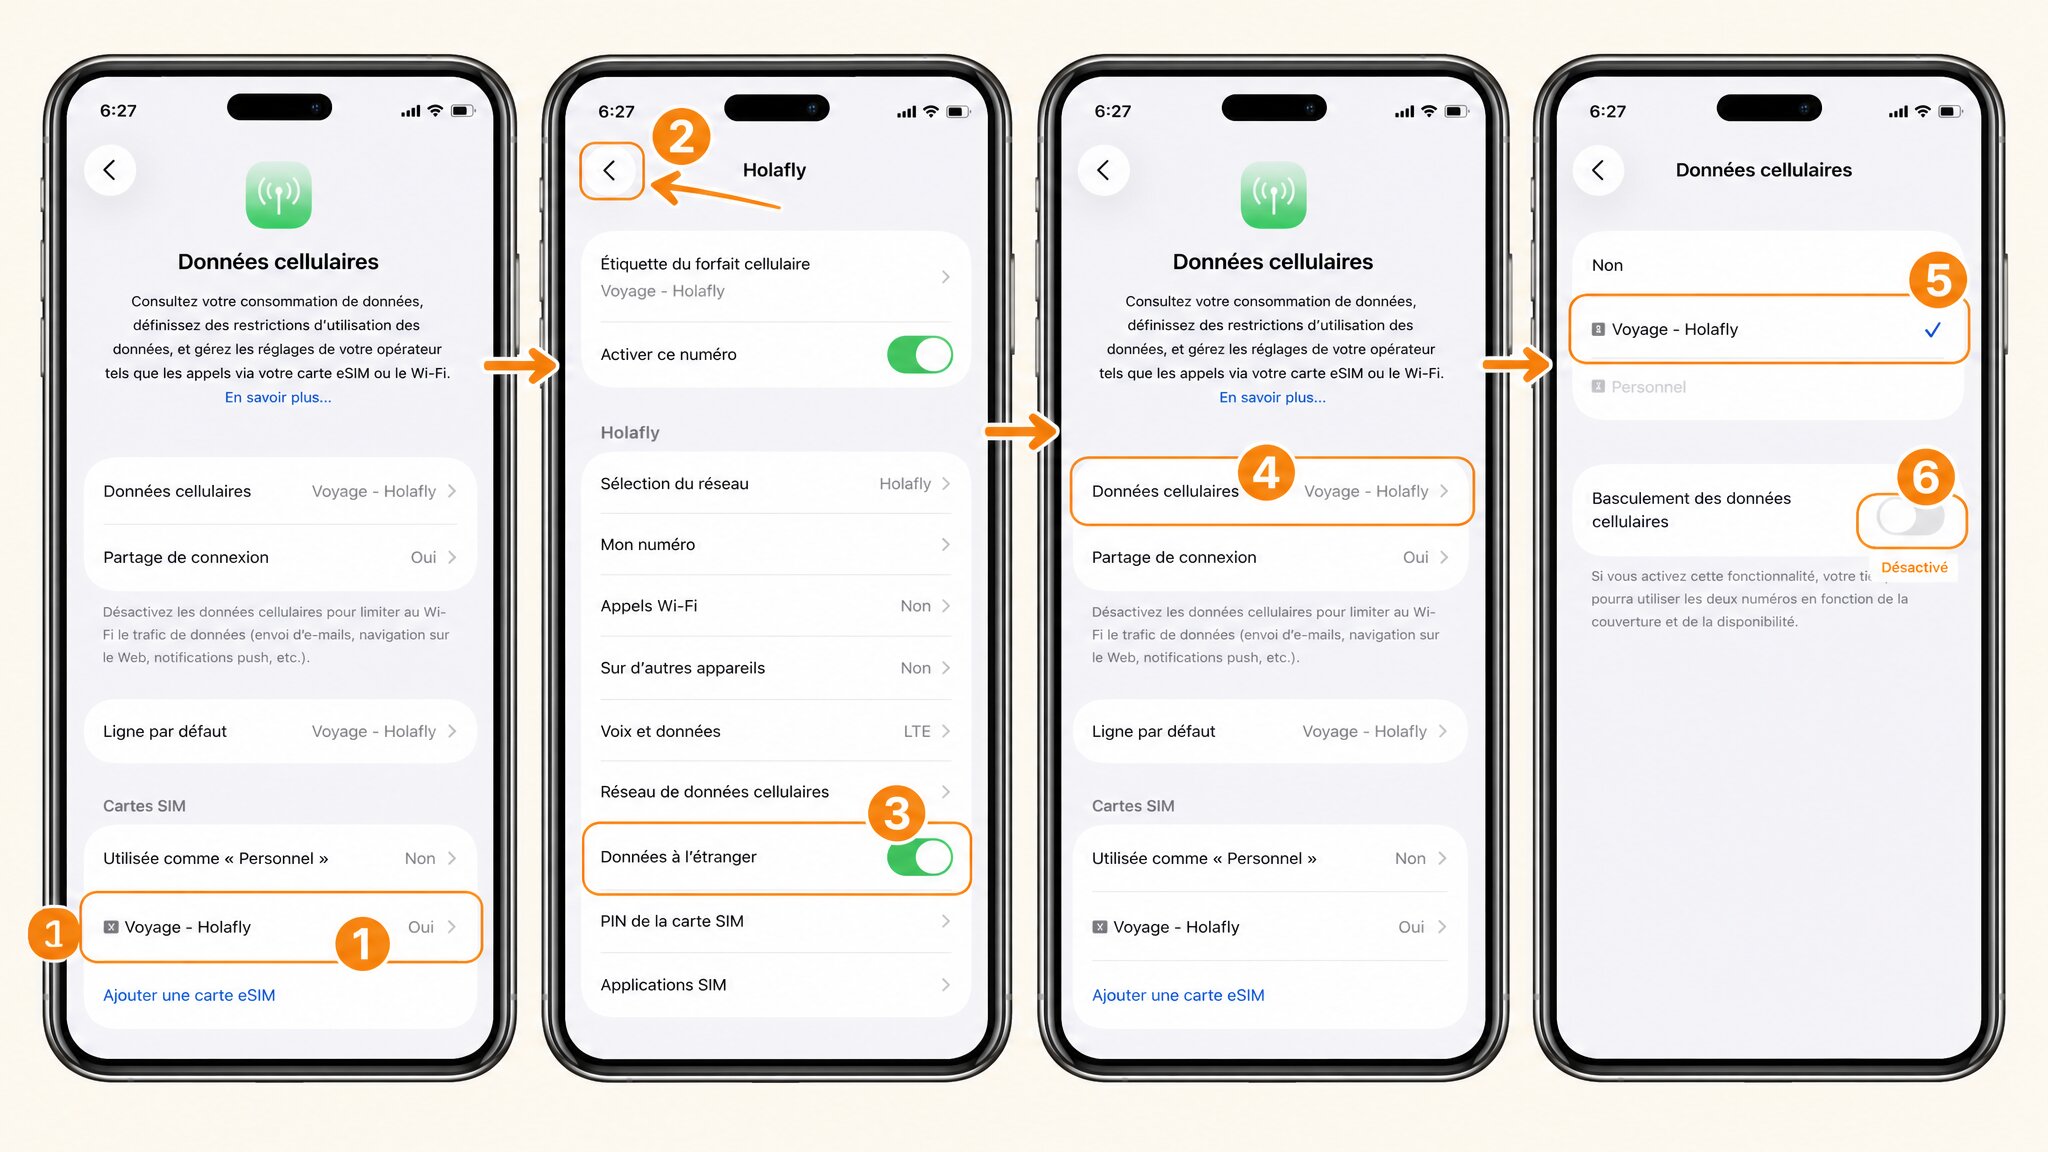
Without this step, your iPhone defaults to your UK SIM for data. That means roaming fees from your UK carrier, which is exactly what you're trying to avoid.
Label Your Lines So You Don't Get Confused
When you have two active lines, iOS lets you name them. It takes 30 seconds and saves a lot of confusion later.
- Go to Settings > Cellular.
- Tap each line and give it a clear label: Personal for your UK SIM, Travel for the eSIM.
- Check which line handles Calls and SMS by default, and adjust if needed.
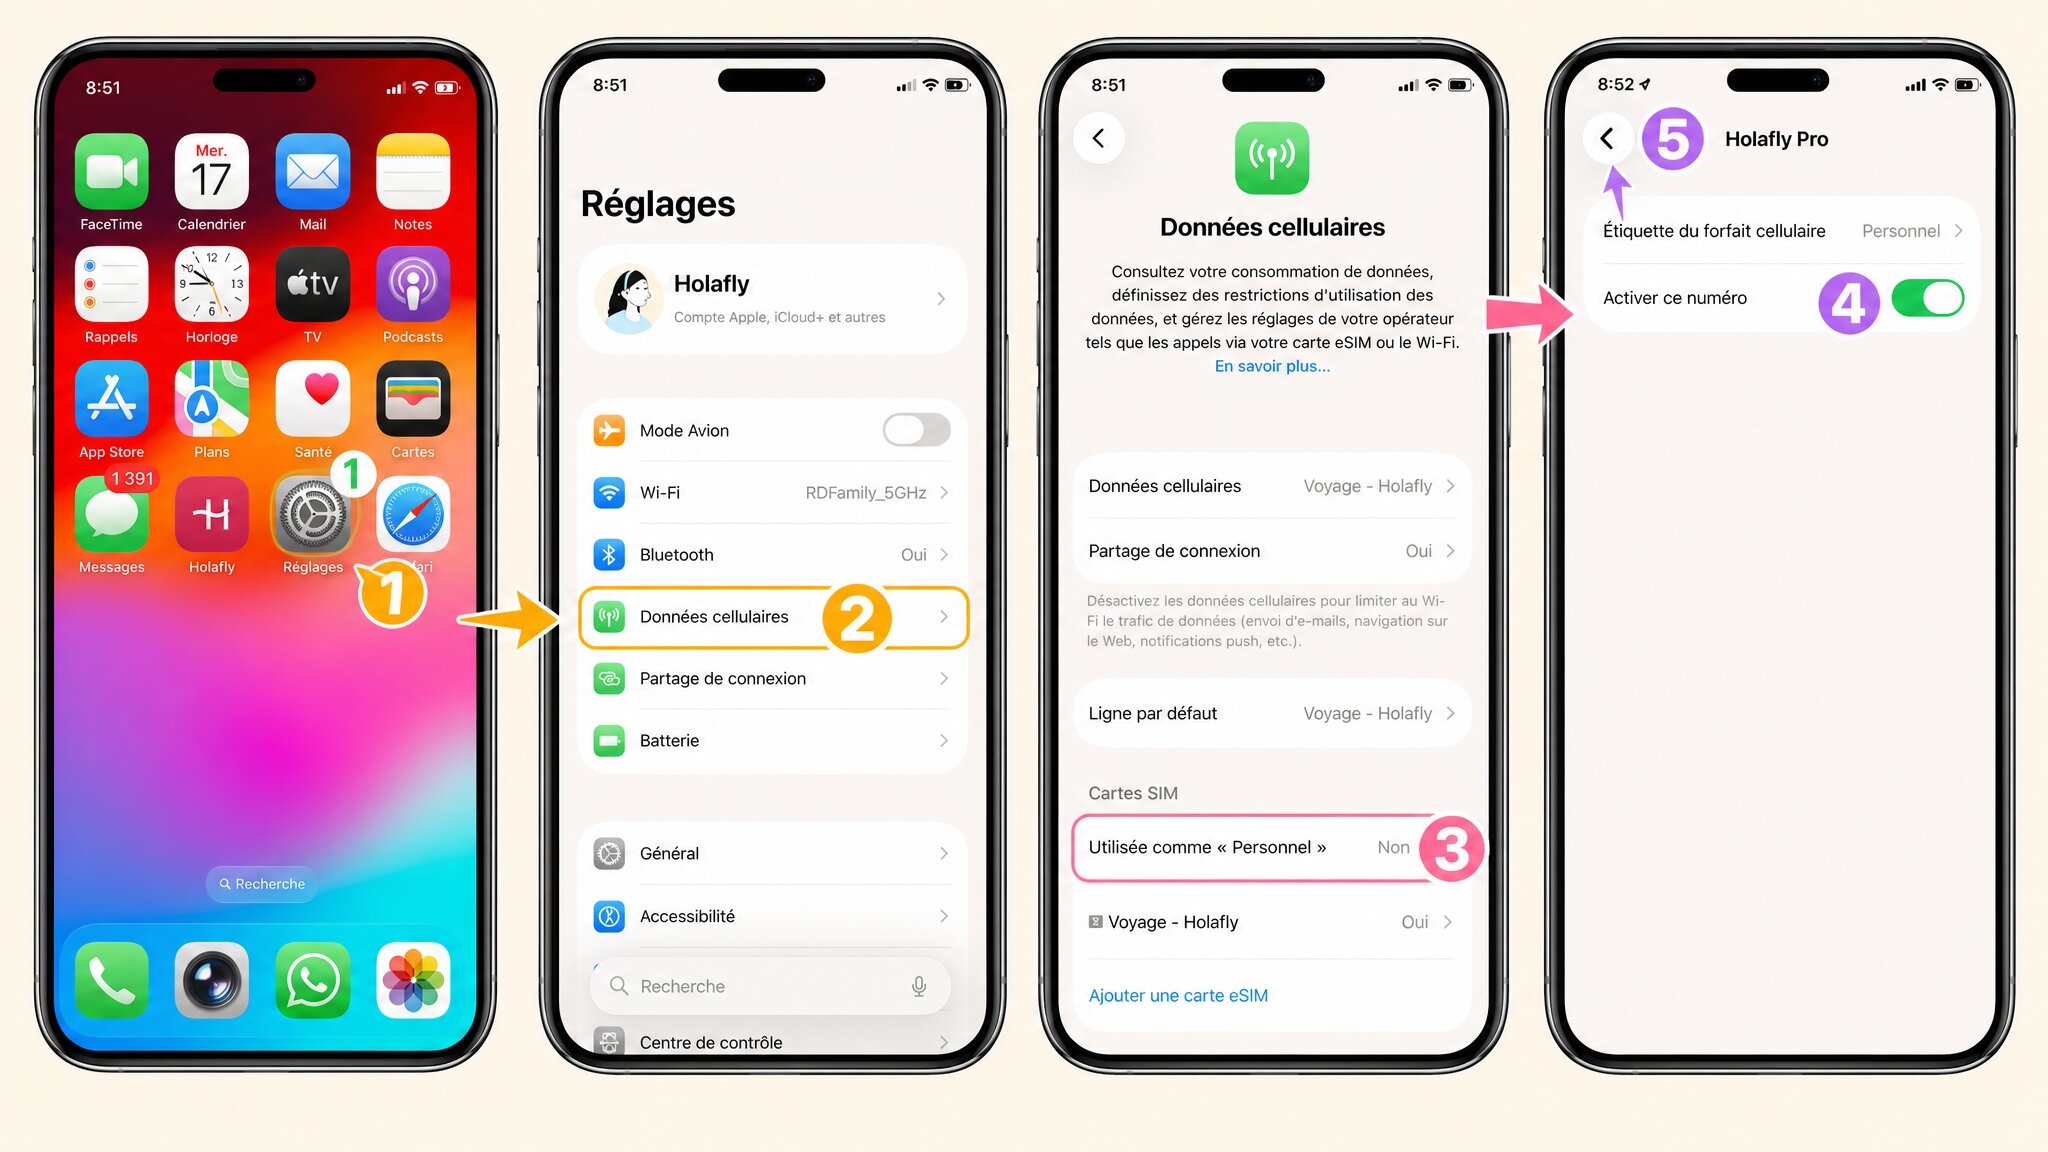
This is especially useful if you're hopping between destinations and swapping eSIMs regularly.
No Signal After Activation? Here's What to Do
You've installed the eSIM, everything looks right, but your iPhone shows "No Service" or "Searching". Don't panic. This is almost always fixable in under two minutes.
Check Network Selection
- Go to Settings > Cellular.
- Tap your travel eSIM, then tap Network Selection.
- Make sure it's set to Automatic.
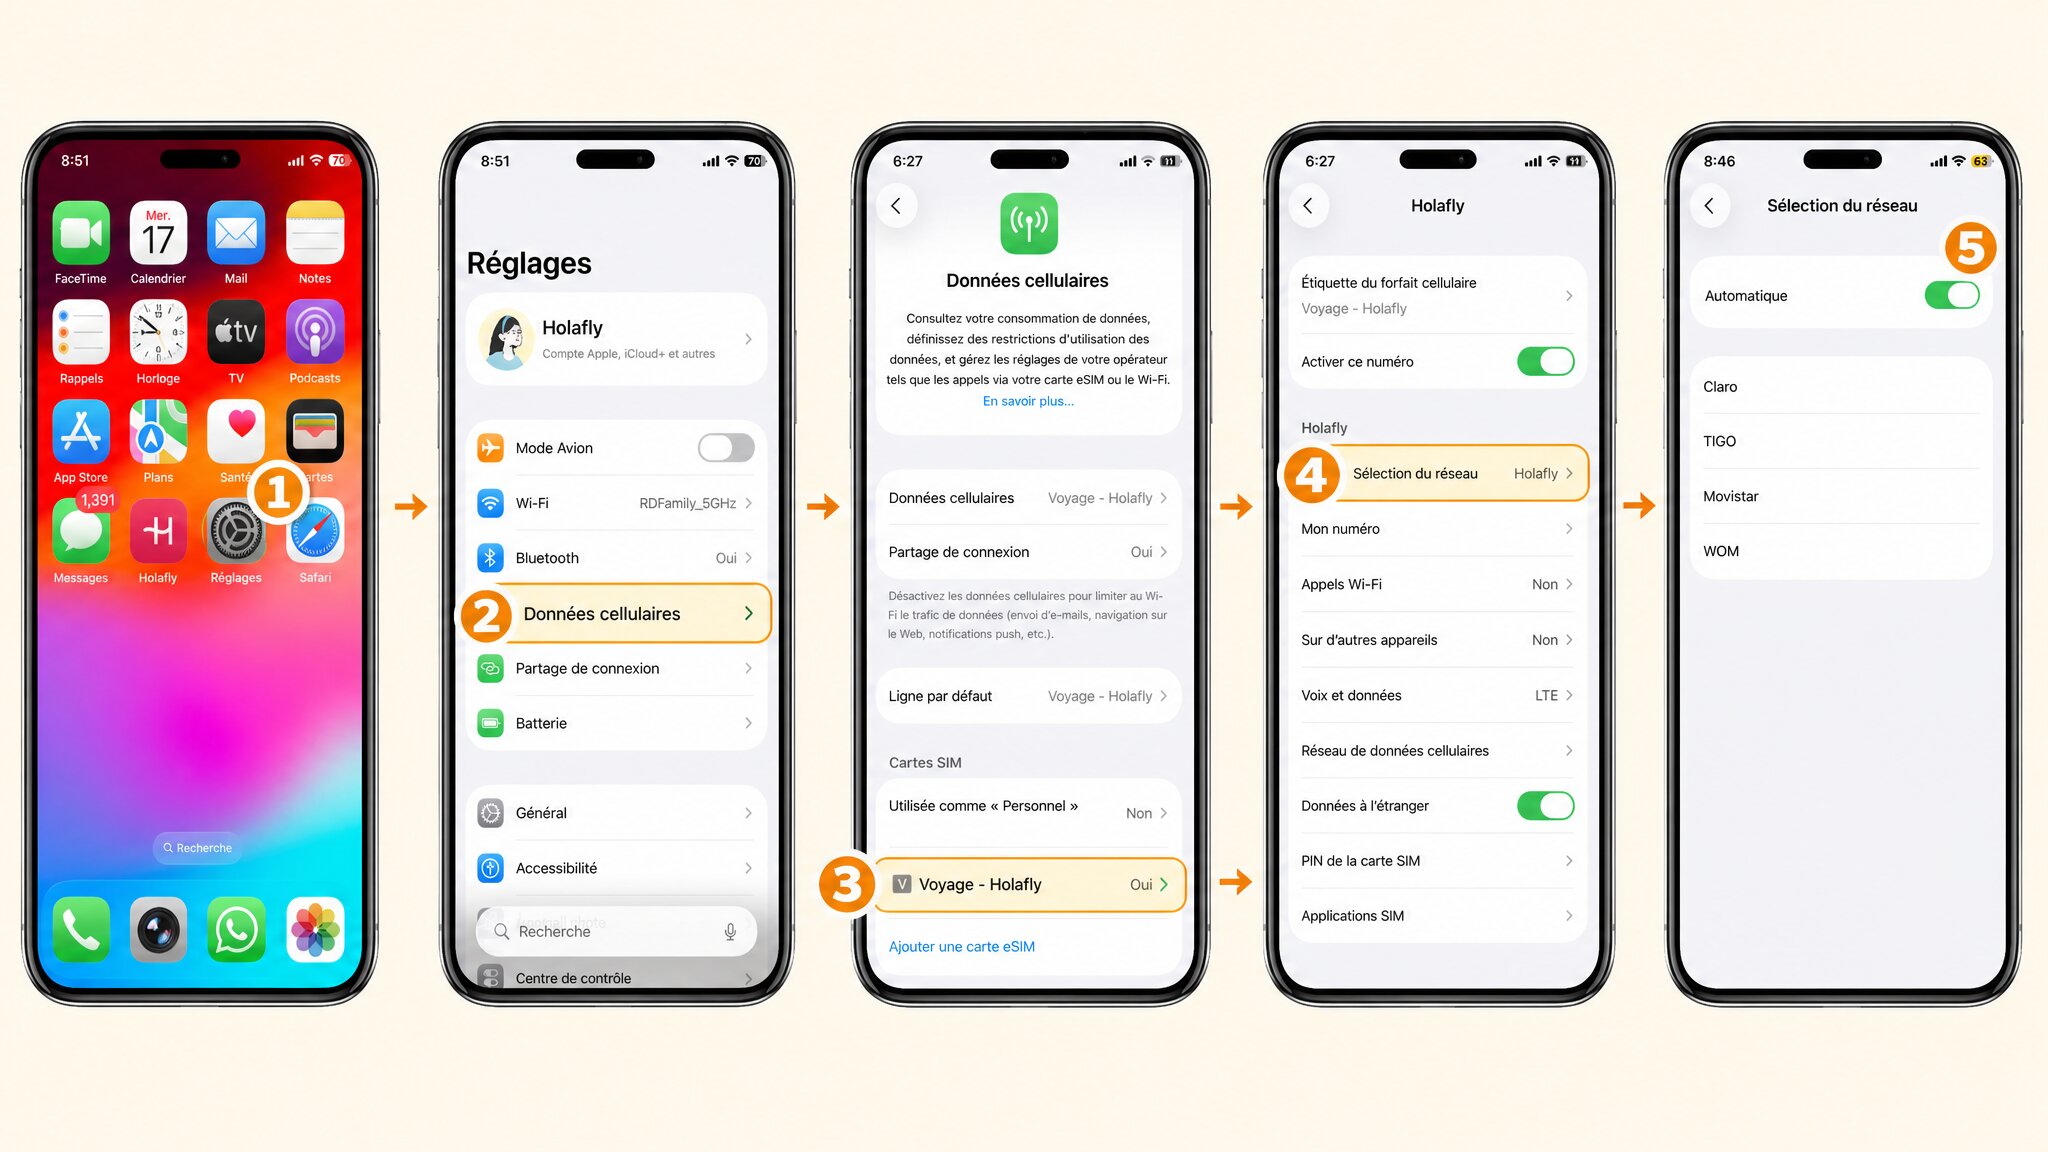
If it's already on Automatic and still not working, check your provider's coverage page to confirm which local networks they partner with in that country.
Quick Fixes That Solve 90% of Cases
Try these in order:
- Aeroplane Mode: Toggle it on for 30 seconds, then off. This forces the iPhone to search for a network.
- Restart: Power the iPhone off completely and back on.
- iOS update: An outdated iOS version can cause activation bugs. Check under Settings > General > Software Update.
One of these almost always does the trick.
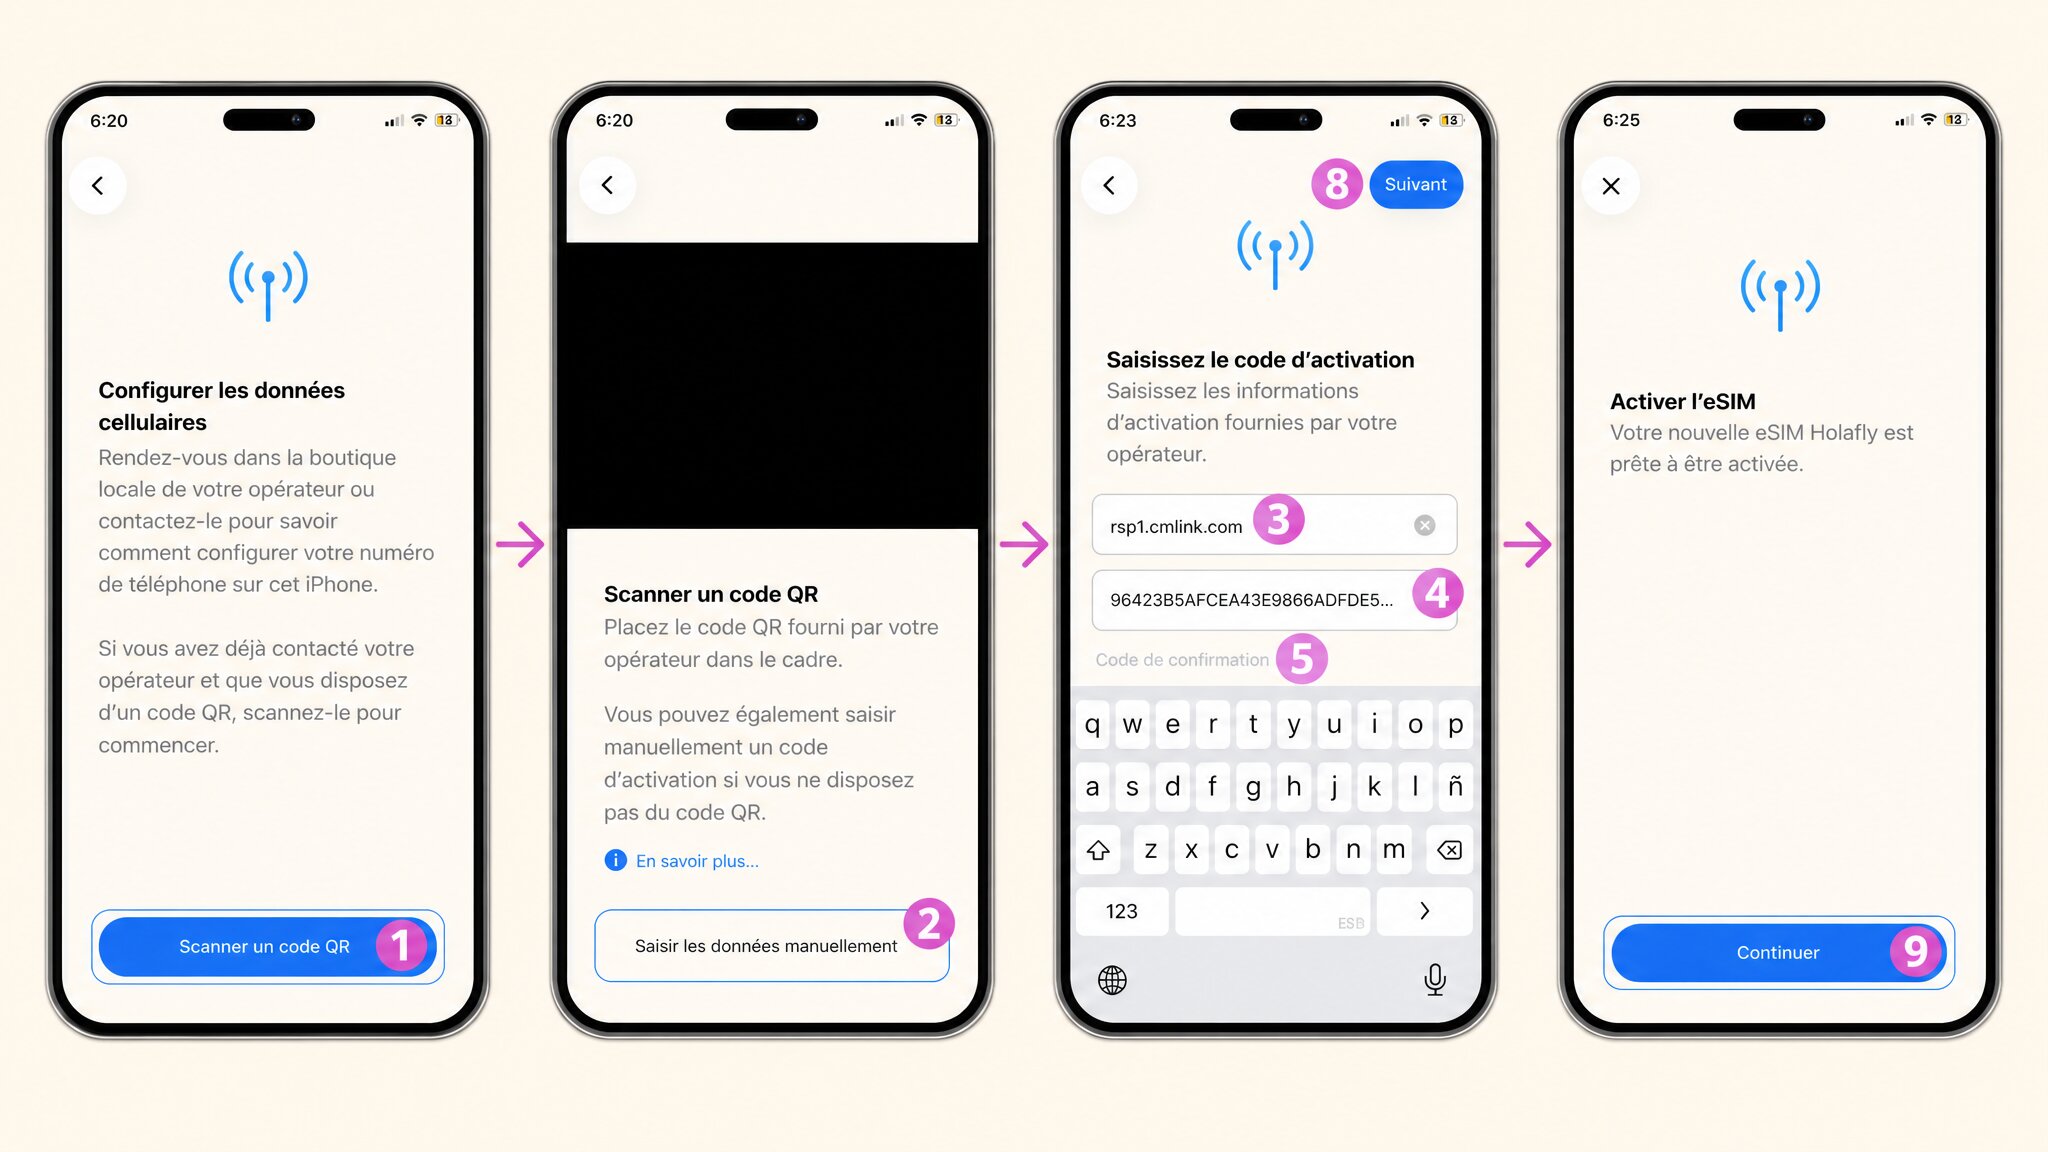
How to Activate an eSIM Without a QR Code
Some providers, particularly smaller regional ones, don't send a QR code. Instead, they give you two pieces of information: an SM-DP+ address (think of it as the server your iPhone connects to) and an activation code.
Enter the Details Manually
- Go to Settings > Cellular > Add eSIM.
- Choose Enter Details Manually.
- Type in the SM-DP+ address in the first field.
- Type in the activation code in the second field.
- Tap Next and follow the same setup steps as a QR code activation.
It's a bit slower than scanning, but the result is identical. Double-check every character, especially hyphens and capital letters, before confirming.
Transferring an eSIM from Another iPhone
If you've just upgraded to a new iPhone, you don't need to buy a new eSIM. Apple's eSIM Quick Transfer lets you move an existing eSIM directly from one iPhone to another, no QR code needed.
- Place both iPhones next to each other.
- On your new iPhone, go to Settings > Cellular > Add eSIM.
- Select Transfer from Nearby iPhone.
- Follow the prompts on both devices.
Not all carriers support this feature. If yours doesn't, you'll need to contact your eSIM provider to get a new QR code issued for the same plan.
Choosing an eSIM for Your Trip
Once you know how the activation works, the main question is which eSIM to buy. Plenty of travel eSIM providers offer plans covering most destinations worldwide, and coverage, data allowances, and pricing vary a lot between them.
Rather than list prices here (they change constantly), I'd point you straight to a live comparison tool where you can filter by destination, data volume, and duration.
Compare travel eSIM plans for your next trip